- Welcome to Cobra Forum.

Recent posts
#91
Webserver / Potential Nginx Configuration ...
Last post by Suhitha - Sep 26, 2025, 02:46 AMQuestion: Potential Nginx Configuration Issues After Updating to Plesk Obsidian 18.0.72 Update 2 on Specific Virtualized Setups
Applicable to:
Symptoms
Cause
This behavior was identified as bug PPPM-15110. In some virtualization setups that use QEMU-based virtual CPUs, Nginx can incorrectly detect the CPU cache line size. This misdetection often results in a default map_hash_bucket_size of 34, which may lead to configuration issues, particularly when processing long IPv6 addresses.
Resolution
Until the bug is fixed, refer to the following workaround to increase the map_hash_bucket_size parameter:
1.Connect to the server via SSH
2.Create a configuration file with the parameter added:
Applicable to:
- Plesk for Linux
Symptoms
- After updating Plesk to Obsidian 18.0.72 Update 2, all domains nginx configuration files are broken.
- Domains show a http 404 error.
- AlmaLinux OS is in use.
- IPv6 addresses are used on the server.
- The CPU with 32-bit cache size or QEMU Virtual CPU is used.
Cause
This behavior was identified as bug PPPM-15110. In some virtualization setups that use QEMU-based virtual CPUs, Nginx can incorrectly detect the CPU cache line size. This misdetection often results in a default map_hash_bucket_size of 34, which may lead to configuration issues, particularly when processing long IPv6 addresses.
Resolution
Until the bug is fixed, refer to the following workaround to increase the map_hash_bucket_size parameter:
1.Connect to the server via SSH
2.Create a configuration file with the parameter added:
Code Select
# echo 'map_hash_bucket_size 64;' >> /etc/nginx/conf.d/fix_hash_bucket.conf
3.Restart nginx:Code Select
# systemctl restart nginx
4.Rebuild the web server configuration:Code Select
# plesk sbin httpdmng --reconfigure-all #92
Webserver / Apache cannot be started if SE...
Last post by Suhitha - Sep 26, 2025, 02:37 AMQuestion: Apache cannot be started if SELinux is in enforcing mode: (13)Permission denied: AH00072: make_sock: could not bind to address 127.0.0.1:7080
Applicable to:
Symptoms
1.Plesk is on AlmaLinux 9 or 10
2.Apache cannot be started if SELinux is in enforcing mode, with the following error appearing in journalctl -xeu httpd.service:
Cause
Product issue:
Resolution
Update Plesk:
How to install Plesk updates
Workaround
If update is not possible for any reason:
Workaround
As a workaround, switch SELinux to permissive mode:
1.Connect to the server via SSH
2.Switch SELinux to permissive mode:
Applicable to:
- Plesk for Linux
Symptoms
1.Plesk is on AlmaLinux 9 or 10
2.Apache cannot be started if SELinux is in enforcing mode, with the following error appearing in journalctl -xeu httpd.service:
Code Select
Sep 12 17:20:23 httpd[6363]: (13)Permission denied: AH00072: make_sock: could not bind to address 127.0.0.1:7080
Sep 12 17:20:23 httpd[6363]: no listening sockets available, shutting down
Cause
Product issue:
- #PPP-69515 "Fixed the issue where, on Plesk servers running AlmaLinux 10, and especially on newly installed Plesk Obsidian 18.0.72 servers, the Plesk selinux policy sometimes would not load."
- Plesk Obsidian 18.0.72 Update 3 16 September 2025 (Linux)
Resolution
Update Plesk:
How to install Plesk updates
Workaround
If update is not possible for any reason:
Workaround
As a workaround, switch SELinux to permissive mode:
1.Connect to the server via SSH
2.Switch SELinux to permissive mode:
Code Select
# setenforce 0 #93
Webserver / Websites on PHP-FPM are unavai...
Last post by Suhitha - Sep 26, 2025, 02:19 AMQuestion: Websites on PHP-FPM are unavailable or loading slowly: server reached max_children setting (*), consider raising it
Applicable to:
Symptoms
Cause
The PHP-FPM pm.max_children limit has been reached by the website(s).
Resolution
Increase the pm.max_children limit for the affected domains:
1.Connect to the Plesk server via SSH
2.Find affected domains using the command below:
Note: The number on the left indicates how many times the pm.max_children limit has been reached by the website.
If a domain is using a dedicated FPM application and has a custom vhosts location, change the path /var/www/vhosts/system/ in the command below:
3.Log into Plesk
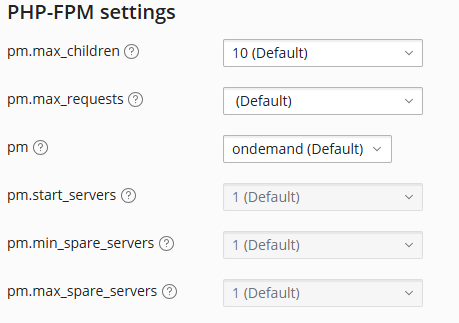
4.Go to Domains > example.com > PHP Settings > PHP-FPM Settings.
5.Increase the pm.max_children value for the domain and apply the changes. Increase this value for all domains listed in step 2.
Note: In this example, we are setting pm.max_children to 20. To fine tune this setting, visit this KB article.
Other options to increase the pm.max_children limit:
Increasing pm.max_children for all domains under a service plan via Plesk
1.Log in to Plesk.
2.Go to Service Plans > plan_name > PHP Settings tab > PHP-FPM Settings section.
3.Increase the pm.max_children value and click Update & Sync.
Note: The changes will not be applied to subscriptions if:
- A subscription is not synced with this service plan (Marked with a blue lock in the Subscriptions menu).
- If the permission Hosting performance settings management is granted in service plan settings at Service Plans > plan_name > Permissions tab.
Increasing pm.max_children for one domain via a command-line interface
1.Create a php.ini file in domain's system directory /var/www/vhosts/system/example.com/conf/:
# touch /var/www/vhosts/system/example.com/conf/php.ini
2.Open the php.ini file in any text editor (for example, vi editor) and add the following records:
3.Save the changes and close the file.
4.Run the following command to apply the changes:
Applicable to:
- Plesk for Linux
Symptoms
- Websites that have PHP handler set as FPM application served by Apache or FPM application served by nginx at Domains > example.com > PHP Settings experience one of the following issues:
- load slowly
- not accessible (permanently or periodically) with a 50x error in a web-browser:
Code Select
502 Bad GatewayCode Select
503 Service Temporarily UnavailableCode Select
504 Gateway Time-out- The following message appears in the PHP-FPM error logfile /var/log/plesk-phpXX-fpm/error.log (where XX is a PHP version used by the websites):
Code Select
WARNING: [pool example.com] server reached max_children setting (*), consider raising itCode Select
The message above is usually accompanied with this error:Code Select
unable to read what child say: Bad file descriptor (9)- If nginx is enabled on the server, one of the following error messages may appear in domain's error logfile /var/www/vhosts/system/example.com/logs/proxy_error_log:
Code Select
[error] 11456#0: *118348 connect() to unix:///var/www/vhosts/system/example.com/php-fpm.sock failed (11: Resource temporarily unavailable) while connecting to upstream, client: 203.0.113.2, server: example.com, request: "GET / HTTP/1.1", upstream: "fastcgi://unix:///var/www/vhosts/system/example.com/php-fpm.sock:", host: "example.com"Code Select
[error] 20058#0: *4725139 upstream prematurely closed connection while reading response header from upstream, client: 203.0.113.2, server: example.com, request: "POST /path/to/some/file HTTP/2.0", upstream:Cause
The PHP-FPM pm.max_children limit has been reached by the website(s).
Resolution
Increase the pm.max_children limit for the affected domains:
1.Connect to the Plesk server via SSH
2.Find affected domains using the command below:
Note: The number on the left indicates how many times the pm.max_children limit has been reached by the website.
If a domain is using a dedicated FPM application and has a custom vhosts location, change the path /var/www/vhosts/system/ in the command below:
Code Select
# grep -r "server reached max_children setting" /var/log/*php*-fpm/error.log | cut -d' ' -f5 | tr -d ']' | sort | uniq -c | sort -nr

100 example.com
50 example.net
25 example.org
<...>3.Log into Plesk
4.Go to Domains > example.com > PHP Settings > PHP-FPM Settings.
5.Increase the pm.max_children value for the domain and apply the changes. Increase this value for all domains listed in step 2.
Note: In this example, we are setting pm.max_children to 20. To fine tune this setting, visit this KB article.
Other options to increase the pm.max_children limit:
Increasing pm.max_children for all domains under a service plan via Plesk
1.Log in to Plesk.
2.Go to Service Plans > plan_name > PHP Settings tab > PHP-FPM Settings section.
3.Increase the pm.max_children value and click Update & Sync.
Note: The changes will not be applied to subscriptions if:
- A subscription is not synced with this service plan (Marked with a blue lock in the Subscriptions menu).
- If the permission Hosting performance settings management is granted in service plan settings at Service Plans > plan_name > Permissions tab.
Increasing pm.max_children for one domain via a command-line interface
1.Create a php.ini file in domain's system directory /var/www/vhosts/system/example.com/conf/:
# touch /var/www/vhosts/system/example.com/conf/php.ini
2.Open the php.ini file in any text editor (for example, vi editor) and add the following records:
Code Select
[php-fpm-pool-settings]
pm.max_children = 20
3.Save the changes and close the file.
4.Run the following command to apply the changes:
Code Select
# /usr/local/psa/bin/php_settings -u #94
Web Application / How to Delete a VPC Network fr...
Last post by Suhitha - Sep 25, 2025, 05:40 AMHow to Delete a VPC Network from a Vultr Account
Permanently removes the selected resource from your Vultr account.
Deleting a Virtual Private Cloud (VPC) network removes routing information and deactivates the associated interfaces on any attached instances.
Follow this guide to delete a VPC network using the Vultr Customer Portal, API, CLI, or Terraform.
Vultr Customer Portal
1.Navigate to Products, expand the Network drop-down and select VPC Networks from the list of options.
2.Select your target VPC network to open its management page.
3.Click Delete VPC Network.
4.Click Delete VPC Network in the confirmation prompt to destroy the VPC network.
Vultr API
1.Send a GET request to the List VPCs endpoint and note the target VPC network's ID in your output.
console
$ curl "https://api.vultr.com/v2/vpcs" \
-X GET \
-H "Authorization: Bearer ${VULTR_API_KEY}"
2.Send a DELETE request to the Delete a VPC endpoint to destroy the target VPC network.
console
$ curl "https://api.vultr.com/v2/vpcs/{vpc-id}" \
-X DELETE \
-H "Authorization: Bearer ${VULTR_API_KEY}"
Vultr CLI
1.List all VPC networks in your Vultr account and note the target VPC network's ID.
console
$ vultr-cli vpc list
2.Delete the VPC network.
console
$ vultr-cli vpc delete <vpc-id>
Terraform
1.Open your Terraform configuration where the VPC is defined.
2.Remove the vultr_vpc resource block, or destroy it by target.
terraform
resource "vultr_vpc" "net" {
region = "ewr"
description = "example-vpc"
}
# To delete, either remove this block from configuration
# or run: terraform destroy -target vultr_vpc.net
3.Apply the configuration and observe the following output:
Apply complete! Resources: 0 added, 0 changed, 1 destroyed.
#95
Web Application / How to Monitor a VPC Network
Last post by Suhitha - Sep 25, 2025, 05:25 AMHow to Monitor a VPC Network
A system that tracks server performance metrics and sends alerts when issues are detected.
Monitoring a Virtual Private Cloud (VPC) network enables the management and verification of the network information. You can view attached instances and subnet information by monitoring a VPC network.
Follow this guide to monitor VPC networks using the Vultr Customer Portal, API, or CLI.
Vultr Customer Portal
Navigate to Products, expand the Network drop-down and select VPC Networks from the list of options.
Select your target VPC network to open its management page.
Click Add Routes to create new static routes in your network, or click Edit Routes to modify the existing route information.
Vultr API
1.Send a GET request to the List VPCs endpoint to view all VPC networks in your Vultr account and note the target VPC network ID.
console
$ curl "https://api.vultr.com/v2/vpcs" \
-X GET \
-H "Authorization: Bearer ${VULTR_API_KEY}"
2.Send a GET request to the Get a VPC endpoint to view information about the target VPC network.
console
$ curl "https://api.vultr.com/v2/vpcs/{vpc-id}" \
-X GET \
-H "Authorization: Bearer ${VULTR_API_KEY}"
Vultr CLI
1.List all VPC networks in your Vultr account and note the target VPC network's ID.
console
$ vultr-cli vpc list
2.Get information about the VPC network.
console
$ vultr-cli vpc get <vpc-id>
#96
Web Application / example
Last post by Suhitha - Sep 25, 2025, 05:11 AMQuestion: example
Version
Updated on 15 September, 2025
Displays the current version of the Vultr CLI tool to help users identify which release theyre running.
The vultr-cli version command displays the current version of the Vultr Command Line Interface tool, helping users identify which release they're running.
Usage
console
$ vultr-cli version
Examples
console
# example
$ vultr-cli version
# Shortened with alias commands
$ vultr-cli v
#97
Web Application / List
Last post by Suhitha - Sep 25, 2025, 05:05 AMQuestion: List
List
The vultr-cli database advanced-option kafka-connect list command displays all available Kafka Connect advanced configuration options for Vultr managed databases, helping developers view customizable parameters.
Usage
console
$ vultr-cli database advanced-option kafka-connect list <Database ID>
#98
Web Application / Update
Last post by Suhitha - Sep 25, 2025, 05:01 AMQuestion: Update
Update
The vultr-cli database advanced-option kafka-connect update command modifies configuration settings for a Kafka Connect service within a managed database instance on Vultr's platform.
Usage
console
$ vultr-cli database advanced-option kafka-connect update <Database ID> [flags]
Flags
Update
The vultr-cli database advanced-option kafka-connect update command modifies configuration settings for a Kafka Connect service within a managed database instance on Vultr's platform.
Usage
console
$ vultr-cli database advanced-option kafka-connect update <Database ID> [flags]
Flags
Code Select
Shorthand	Long Version	Description
-	--connector-client-config-override-policy	set the managed database Kafka Connect configuration value for connector_client_config_override_policy
-	--consumer-auto-offset-reset	set the managed database Kafka Connect configuration value for consumer_auto_offset_reset
-	--consumer-fetch-max-bytes	set the managed database Kafka Connect configuration value for consumer_fetch_max_bytes
-	--consumer-isolation-level	set the managed database Kafka Connect configuration value for consumer_isolation_level
-	--consumer-max-partition-fetch-bytes	set the managed database Kafka Connect configuration value for consumer_max_partition_fetch_bytes
-	--consumer-max-poll-interval-ms	set the managed database Kafka Connect configuration value for consumer_max_poll_interval_ms
-	--consumer-max-poll-records	set the managed database Kafka Connect configuration value for consumer_max_poll_records
-	--offset-flush-interval-ms	set the managed database Kafka Connect configuration value for offset_flush_interval_ms
-	--offset-flush-timeout-ms	set the managed database Kafka Connect configuration value for offset_flush_timeout_ms
-	--producer-batch-size	set the managed database Kafka Connect configuration value for producer_batch_size
-	--producer-buffer-memory	set the managed database Kafka Connect configuration value for producer_buffer_memory
-	--producer-compression-type	set the managed database Kafka Connect configuration value for producer_compression_type
-	--producer-linger-ms	set the managed database Kafka Connect configuration value for producer_linger_ms
-	--producer-max-request-size	set the managed database Kafka Connect configuration value for producer_max_request_size
-	--scheduled-rebalance-max-delay-ms	set the managed database Kafka Connect configuration value for scheduled_rebalance_max_delay_ms
-	--session-timeout-ms	set the managed database Kafka Connect configuration value for session_timeout_ms
#99
Web Application / List
Last post by Suhitha - Sep 25, 2025, 04:56 AMQuestion: List
The vultr-cli database advanced-option kafka-rest list command displays all available Kafka REST advanced configuration options for your Vultr managed database instance.
Usage
console
$ vultr-cli database advanced-option kafka-rest list <Database ID>
The vultr-cli database advanced-option kafka-rest list command displays all available Kafka REST advanced configuration options for your Vultr managed database instance.
Usage
console
$ vultr-cli database advanced-option kafka-rest list <Database ID>
#100
Web Application / Update
Last post by Suhitha - Sep 25, 2025, 04:48 AMQuestion: Update
Update
The vultr-cli database advanced-option kafka-rest update command updates Kafka REST configuration settings for a Vultr managed database instance, allowing customization of the REST proxy service.
Usage
console
$ vultr-cli database advanced-option kafka-rest update <Database ID> [flags]
Flags
Update
The vultr-cli database advanced-option kafka-rest update command updates Kafka REST configuration settings for a Vultr managed database instance, allowing customization of the REST proxy service.
Usage
console
$ vultr-cli database advanced-option kafka-rest update <Database ID> [flags]
Flags
Code Select
Shorthand    Long Version    Description
-    --consumer-enable-auto-commit    set the managed database Kafka REST configuration value for consumer_enable_auto_commit
-    --consumer-request-max-bytes    set the managed database Kafka REST configuration value for consumer_request_max_bytes
-    --consumer-request-timeout-ms    set the managed database Kafka REST configuration value for consumer_request_timeout_ms
-    --name-strategy    set the managed database Kafka REST configuration value for name_strategy
-    --name-strategy-validation    set the managed database Kafka REST configuration value for name_strategy_validation
-    --producer-acks    set the managed database Kafka REST configuration value for producer_acks
-    --producer-compression-type    set the managed database Kafka REST configuration value for producer_compression_type
-    --producer-linger-ms    set the managed database Kafka REST configuration value for producer_linger_ms
-    --producer-max-request-size    set the managed database Kafka REST configuration value for producer_max_request_size
-    --simpleconsumer-pool-size-max    set the managed database Kafka REST configuration value for simpleconsumer_pool_size_max