- Welcome to Cobra Forum.

Recent posts
#1
Webserver / Unable to start Apache on a Pl...
Last post by Suhitha - Oct 01, 2025, 08:33 AMQuestion: Unable to start Apache on a Plesk server: No matches for the wildcard '*.conf' in
Symptoms
Apache web-server fails to start with the following error message in configuration:
Note: The name of the ModSecurity rule-set in the error message may vary.
on CentOS/RHEL-based distributions
on Debian/Ubuntu-based distributions:
Cause
The ModSecurity configuration file zz_rules.conf contains links to non-existent files.
Resolution
To solve the issue need to update the zz_rules.conf and replace "Include" option with "IncludeOptional".
For CentOS/RHEL-based distributions
1.Connect to the Plesk server via SSH.
2.Open the file zz_rules.conf in a text editor. In this example, we are using the vi editor:
3.Replace "Include" with "IncludeOptional" in all lines.
4.Save the changes and close the file.
5.Start Apache:
# service httpd start
6.Log in to Plesk > go to Tools & Settings > Web Application Firewall (ModSecurity) and activate ModSecurity.
For Debian/Ubuntu-based distributions
1.Connect to the Plesk server via SSH.
2.Open the file zz_rules.conf in a text editor. In this example, we are using the vi editor:
# vi /etc/apache2/modsecurity.d/zz_rules.conf
3.Replace "Include" with "IncludeOptional" in all lines.
4.Save the changes and close the file.
5.Start Apache:
# service apache2 start
6.Log in to Plesk > go to Tools & Settings > Web Application Firewall (ModSecurity) and activate ModSecurity.
Symptoms
Apache web-server fails to start with the following error message in configuration:
Note: The name of the ModSecurity rule-set in the error message may vary.
on CentOS/RHEL-based distributions
Code Select
# httpd -t
httpd: Syntax error on line 353 of /etc/httpd/conf/httpd.conf: Syntax error on line 5 of /etc/httpd/conf.d/security2.conf: Syntax error on line 6 of /etc/httpd/conf/modsecurity.d/zz_rules.conf: No matches for the wildcard '*.conf' in '/etc/httpd/conf/modsecurity.d/rules/modsecurity_crs-plesk', failing (use IncludeOptional if required)
on Debian/Ubuntu-based distributions:
Code Select
apache2ctl -t
apache2: Syntax error on line 141 of /etc/apache2/apache2.conf: Syntax error on line 4 of /etc/apache2/mods-enabled/security2.conf: Syntax error on line 6 of /etc/apache2/modsecurity.d/zz_rules.conf: No matches for the wildcard '*.conf' in
'/etc/apache2/modsecurity.d/rules/tortix', failing (use IncludeOptional if required)
Cause
The ModSecurity configuration file zz_rules.conf contains links to non-existent files.
Resolution
To solve the issue need to update the zz_rules.conf and replace "Include" option with "IncludeOptional".
For CentOS/RHEL-based distributions
1.Connect to the Plesk server via SSH.
2.Open the file zz_rules.conf in a text editor. In this example, we are using the vi editor:
Code Select
# vi /etc/httpd/conf/modsecurity.d/zz_rules.conf3.Replace "Include" with "IncludeOptional" in all lines.
4.Save the changes and close the file.
5.Start Apache:
# service httpd start
6.Log in to Plesk > go to Tools & Settings > Web Application Firewall (ModSecurity) and activate ModSecurity.
For Debian/Ubuntu-based distributions
1.Connect to the Plesk server via SSH.
2.Open the file zz_rules.conf in a text editor. In this example, we are using the vi editor:
# vi /etc/apache2/modsecurity.d/zz_rules.conf
3.Replace "Include" with "IncludeOptional" in all lines.
4.Save the changes and close the file.
5.Start Apache:
# service apache2 start
6.Log in to Plesk > go to Tools & Settings > Web Application Firewall (ModSecurity) and activate ModSecurity.
#2
Webserver / All websites are down with 502...
Last post by Suhitha - Oct 01, 2025, 08:20 AMQuestion: All websites are down with 502 Bad Gateway error: apache2 or httpd is not running
Applicable to:
Symptoms
For Debian-based OS (Debian, Ubuntu):
Cause
The SSL certificate file that is reported in the error message is missing or is corrupted, due to which it has an improper size or is not found at all.
Resolution
Note: If the domain example.com was removed previously from the server, apply the solution from the article: Apache or nginx fails to start: BIO_new_file: certificate not found: No such file or directory: nginx: configuration file /etc/nginx/nginx.conf test failed
Recreate the SSL certificates on the server by following these steps:
1.Connect to the server via SSH
2.Rebuild the missing or corrupted certificates for domains by using the following command:
# plesk repair web -sslcerts
3.Check the Apache configuration files for errors:
For RHEL-based OS (CentOS, CloudLinux, RedHat:
# httpd -t
The expected output is the following
For Debian-based OS (Debian, Ubuntu):
# apache2ctl configtest
The expected output is the following
4.Rebuild the Apache configuration files for all domains on the server:
Warning: During this operation websites will be unavailable for a short period of time. The execution time of this command depends on the number of domains on the server.
# /usr/local/psa/admin/bin/httpdmng --reconfigure-all
If steps aforementioned steps was not helped remove files manually and repeat steps 1-4 again:
# rm -f /etc/nginx/plesk.conf.d/webmails/*
# rm -f /etc/httpd/conf/plesk.conf.d/webmails/*
# rm -f /etc/httpd/conf/plesk.conf.d/server.conf
Note: the certificate file may still exist in the nginx config /etc/nginx/plesk.conf.d/server.conf, disabling or enabling nginx should fix the issue.
Applicable to:
- Plesk for Linux
Symptoms
- All websites on the Plesk server are showing a 502 Bad Gateway error while opened in a browser
- Attempts to start Apache and Apache configuration tests fail with an error that is similar to the following:
Code Select
AH00526: Syntax error on line 51 of /etc/apache2/plesk.conf.d/vhosts/example.com.conf:
SSLCertificateFile: file '/opt/psa/var/certificates/cert1Ape62' does not exist or is empty
- The following error is shown in the Plesk GUI:
- That SSL certificate that is reported in the error message has zero size:
Code Select
# ls -l /usr/local/psa/var/certificates/cert1Ape62
...
-r-------- 1 root root 0 Mar 24 12:26 /opt/psa/var/certificates/cert1Ape62
For Debian-based OS (Debian, Ubuntu):
Code Select
# ls -l /opt/psa/var/certificates/cert1Ape62
...
-r-------- 1 root root 0 Mar 24 12:26 /opt/psa/var/certificates/cert1Ape62
- The Plesk web server reconfiguration utility fails with an error that is similar to the following:
Code Select
# /usr/local/psa/admin/bin/httpdmng --reconfigure-domain example.com
...
ERR [panel] Apache config (14972022740.47990300) generation failed: Template_Exception: Syntax error on line 51 of /etc/httpd/conf/plesk.conf.d/ip_default/example.conf:
SSLCACertificateFile: file '/usr/local/psa/var/certificates/cert1Ape62' does not exist or is empty- Repairing files system permissions with the plesk repair utility results in an error that is similar to the following
Code Select
# plesk repair fs -y -v
Checking Linux system files ......................................... [OK]
Checking virtual hosts' file system
There are incorrect permissions on some items in the system
directory for the domain 'example.com' .......................... [ERROR]
- Failed to stat
/var/www/vhosts/system/example.com/conf/webalizer.conf: No
such file or directory
Repairing incorrect permissions ................................. [FAILED]
- openat 'webalizer.conf' failed: No such file or directory
Failed to open safely
/var/www/vhosts/system/example.com/conf/webalizer.conf: No
such file or directory
- All websites on the server are not accessible, while showing a browser error that is similar to the following :
Code Select
ERR_CONNECTION_REFUSEDCause
The SSL certificate file that is reported in the error message is missing or is corrupted, due to which it has an improper size or is not found at all.
Resolution
Note: If the domain example.com was removed previously from the server, apply the solution from the article: Apache or nginx fails to start: BIO_new_file: certificate not found: No such file or directory: nginx: configuration file /etc/nginx/nginx.conf test failed
Recreate the SSL certificates on the server by following these steps:
1.Connect to the server via SSH
2.Rebuild the missing or corrupted certificates for domains by using the following command:
# plesk repair web -sslcerts
3.Check the Apache configuration files for errors:
For RHEL-based OS (CentOS, CloudLinux, RedHat:
# httpd -t
The expected output is the following
Code Select
Syntax OKFor Debian-based OS (Debian, Ubuntu):
# apache2ctl configtest
The expected output is the following
Code Select
Syntax OK4.Rebuild the Apache configuration files for all domains on the server:
Warning: During this operation websites will be unavailable for a short period of time. The execution time of this command depends on the number of domains on the server.
# /usr/local/psa/admin/bin/httpdmng --reconfigure-all
If steps aforementioned steps was not helped remove files manually and repeat steps 1-4 again:
# rm -f /etc/nginx/plesk.conf.d/webmails/*
# rm -f /etc/httpd/conf/plesk.conf.d/webmails/*
# rm -f /etc/httpd/conf/plesk.conf.d/server.conf
Note: the certificate file may still exist in the nginx config /etc/nginx/plesk.conf.d/server.conf, disabling or enabling nginx should fix the issue.
#3
Webserver / ASPX Script Timing Out Due to ...
Last post by Suhitha - Oct 01, 2025, 08:01 AMQuestion: ASPX Script Timing Out Due to Session Timeout: How to Increase the Limit
Symptoms
The ASP.NET session timeout for the site is set to 60 minutes in Domains > example.com > ASP.NET settings, however the client's script times out after 5-10 minutes.
Cause
Application Pool Idle Timeout affects script timeout.
Resolution
Adjust the Application Pool Idle Timeout in IIS > Application pools > Domain Application Pool > Properties > Idle Time-out.
Also, it might be required to set additional timeout in IIS > Website > example.com > Session State > TimeOut.
For additional information and code examples please refer to the Official Microsoft IIS Site.
#4
Webserver / What is the difference between...
Last post by Suhitha - Oct 01, 2025, 07:56 AMQuestion
What is the difference between FastCGI, FPM and dedicated FPM served by nginx or Apache PHP handlers in Plesk?
Answer
Briefly saying, their major difference is in site isolation level - the more isolated the handler is, the more secure it is to use. In ascending order:
Note: This will allow you to isolate sites from each other at the PHP handler level and reduce the impact of one site on other sites running on the same version of the PHP handler. This is very useful in situations where there are memory leaks or vulnerabilities in the code.
FastCGI
FastCGI is an improved version of the CGI handler used in the old PHP versions. FastCGI has better security than CGI: its process runs on behalf of the Plesk subscription's system user instead of the Apache user. Having fewer privileges limits the attacker's actions in case the subscription user is compromised.
Compared to FPM, FastCGI is slower and generally consumes more RAM.
FPM
PHP-FPM (FastCGI Process Manager) is a process manager for FastCGI SAPI (Server API). It is more secure, faster, and consumes less RAM compared to FastCGI. More details are available on this blog page: https://www.plesk.com/blog/various/why-do-you-need-php-fpm/
The downside is that all FPM processes have one point of failure - a common master process. All websites with the same PHP handler on PHP-FPM use a single FPM master, which means that:
1.All sites use a single OPcache cache because the cache is bound to the master
2.In case any PHP settings are changed or a site is added or removed from the handler, the master will be restarted, which means that all active requests to all websites on this handler are terminated and can return errors 502
3.In case the PHP-FPM master crashes, all sites with this PHP handler will be down.
Dedicated FPM
Dedicated FPM introduces more granular control for PHP-FPM master processes: per subscription or per-domain. This means improved stability and isolation for Plesk websites working with PHP-FPM handlers.
However, this leads to increased load on the server.
FPM served by Apache vs FPM served by nginx
Consider the following when chosing between FPM served by Apache or FPM served by nginx in Domains > example.com > PHP Settings:
Generally, it is recommended to enable FPM served by nginx for better site performance and lower CPU load. It is also recommended to keep proxy mode enabled in Domains > example.com > Apache & nginx Settings because it allows both Apache and nginx to handle the tasks they are the best suited for.
If nginx is selected, existing .htaccess rules for Apache should be converted to nginx syntax: How to keep .htaccess rules after switching PHP handler from Apache to nginx in Plesk?
Related to
Plesk for Linux
What is the difference between FastCGI, FPM and dedicated FPM served by nginx or Apache PHP handlers in Plesk?
Answer
Briefly saying, their major difference is in site isolation level - the more isolated the handler is, the more secure it is to use. In ascending order:
- FastCGI
- FPM
- Dedicated FPM
Note: This will allow you to isolate sites from each other at the PHP handler level and reduce the impact of one site on other sites running on the same version of the PHP handler. This is very useful in situations where there are memory leaks or vulnerabilities in the code.
FastCGI
FastCGI is an improved version of the CGI handler used in the old PHP versions. FastCGI has better security than CGI: its process runs on behalf of the Plesk subscription's system user instead of the Apache user. Having fewer privileges limits the attacker's actions in case the subscription user is compromised.
Compared to FPM, FastCGI is slower and generally consumes more RAM.
FPM
PHP-FPM (FastCGI Process Manager) is a process manager for FastCGI SAPI (Server API). It is more secure, faster, and consumes less RAM compared to FastCGI. More details are available on this blog page: https://www.plesk.com/blog/various/why-do-you-need-php-fpm/
The downside is that all FPM processes have one point of failure - a common master process. All websites with the same PHP handler on PHP-FPM use a single FPM master, which means that:
1.All sites use a single OPcache cache because the cache is bound to the master
2.In case any PHP settings are changed or a site is added or removed from the handler, the master will be restarted, which means that all active requests to all websites on this handler are terminated and can return errors 502
3.In case the PHP-FPM master crashes, all sites with this PHP handler will be down.
Dedicated FPM
Dedicated FPM introduces more granular control for PHP-FPM master processes: per subscription or per-domain. This means improved stability and isolation for Plesk websites working with PHP-FPM handlers.
However, this leads to increased load on the server.
FPM served by Apache vs FPM served by nginx
Consider the following when chosing between FPM served by Apache or FPM served by nginx in Domains > example.com > PHP Settings:
- Nginx is faster at handling static content. It consumes fewer resources to maintain keep-alive connections.
- Nginx + PHP FPM and Apache + PHP FPM combinations perform the same when handling dynamic content
- Apache has more modules and managing permissions via .htaccess directives, making it more universal
Generally, it is recommended to enable FPM served by nginx for better site performance and lower CPU load. It is also recommended to keep proxy mode enabled in Domains > example.com > Apache & nginx Settings because it allows both Apache and nginx to handle the tasks they are the best suited for.
If nginx is selected, existing .htaccess rules for Apache should be converted to nginx syntax: How to keep .htaccess rules after switching PHP handler from Apache to nginx in Plesk?
Related to
Plesk for Linux
#5
Webserver / What does 403 message in ModSe...
Last post by Suhitha - Oct 01, 2025, 07:43 AMQuestion: What does 403 message in ModSecurity logs on Plesk server mean?
Question
A 403 message from ModSecurity such as the one below appears in the logs, what does it mean?
Answer
Whenever the Web Application Firewall (WAF) detects an insecure access request that matches one of the rules from the ruleset, it blocks the access and records this message in the logs.
This message is usually benign, as it means that WAF is behaving as expected and blocking unwanted requests, however, in some cases, legitimate requests can be blocked. When these false positives occur WAF blocks requests to content (images, pages, menus) that should be available, throwing a 403 error. In such cases, it may be required to disable a rule, as described in the article How to disable specific ModSecurity rules in Plesk.
Question
A 403 message from ModSecurity such as the one below appears in the logs, what does it mean?
Code Select
[client 203.0.113.2] ModSecurity: Access denied with code 403 (phase 2). Operator EQ matched 0 at REQUEST_COOKIES_NAMES. [file "/etc/apache2/modsecurity.d/rules/comodo_free/26_Apps_WordPress.conf"] [line "155"] [id "225170"] [rev "3"] [msg "COMODO WAF: Sensitive Information Disclosure Vulnerability in WordPress 4.7 (CVE-2017-5487)||] [severity "CRITICAL"] [tag "CWAF"] [tag "WordPress"] [hostname "] [uri "/wp-json/wp/v2/users/1"] [unique_id "YR6l04Z@9OqHIdEQWcNAqwAAAEE"]Answer
Whenever the Web Application Firewall (WAF) detects an insecure access request that matches one of the rules from the ruleset, it blocks the access and records this message in the logs.
This message is usually benign, as it means that WAF is behaving as expected and blocking unwanted requests, however, in some cases, legitimate requests can be blocked. When these false positives occur WAF blocks requests to content (images, pages, menus) that should be available, throwing a 403 error. In such cases, it may be required to disable a rule, as described in the article How to disable specific ModSecurity rules in Plesk.
#6
Webserver / Error in Plesk inteface: New c...
Last post by Suhitha - Oct 01, 2025, 07:36 AMQuestion: Error in Plesk inteface: New configuration files were not created: Could not open configuration file: No such file or directory
Applicable to:
Symptoms
The domain example.com (from the error message) is not visible anywhere within the Plesk GUI
Cause
The domain was not completely removed from the Linux server and only some web server configuration files that are related to it remain, which causes the error.
Resolution
Via SSH
1.Connect to the Plesk server via SSH
2.Rebuild web server configuration files:
# plesk sbin httpdmng --reconfigure-server
Via Plesk GUI
1.Log into Plesk
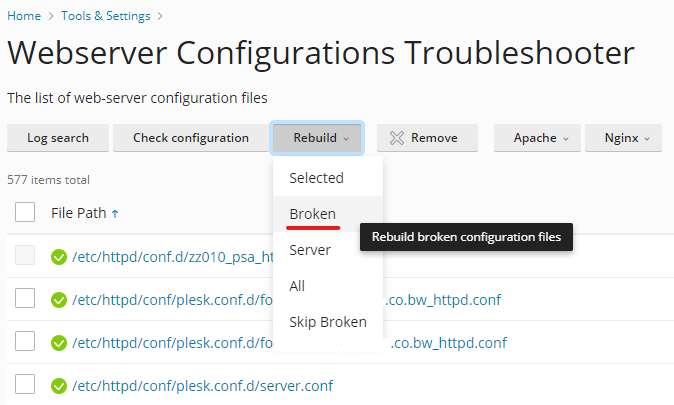
2.Open Tools & Settings > Webserver Configurations Troubleshooter > Rebuild > Broken:
If the above does not help, use these manual removal steps
1.Connect to the Plesk server via SSH
2.Move vhosts configuration files to the different directories:
For CentOS / RedHat/ CloudLinux:
For Debian / Ubuntu:
3.Rebuild all web server configuration files from scratch by executing this command:
If all of the above solutions do not resolve the error, follow the steps here
1.In Plesk create the domain example.com.
2.Connect to the Plesk server via SSH
3.Rebuild domain's configuration files:
# plesk repair web example.com
4.Remove the domain example.com from Plesk.
Note: In case there are other domains with the same issue, perform the same actions mentioned above.
Applicable to:
- Plesk for Linux
Symptoms
- The following error is shown within the Plesk GUI:
- The file mentioned in the error message exists, but its link is missing (or vice versa):
Code Select
# ls -l /etc/httpd/conf/plesk.conf.d/vhosts/example.com.conf
lrwxrwxrwx 1 root root 55 Aug 7 13:36 /etc/httpd/conf/plesk.conf.d/vhosts/example.com.conf -> /var/www/vhosts/system/example.com/conf/httpd.conf
ls -l /var/www/vhosts/system/example.com/conf/httpd.conf
ls: cannot access /var/www/vhosts/system/example.com/conf/httpd.conf: No such file or directory
The domain example.com (from the error message) is not visible anywhere within the Plesk GUI
Cause
The domain was not completely removed from the Linux server and only some web server configuration files that are related to it remain, which causes the error.
Resolution
Via SSH
1.Connect to the Plesk server via SSH
2.Rebuild web server configuration files:
# plesk sbin httpdmng --reconfigure-server
Via Plesk GUI
1.Log into Plesk
2.Open Tools & Settings > Webserver Configurations Troubleshooter > Rebuild > Broken:
If the above does not help, use these manual removal steps
1.Connect to the Plesk server via SSH
2.Move vhosts configuration files to the different directories:
For CentOS / RedHat/ CloudLinux:
Code Select
mkdir -p /root/plesk-backup-nginx/webmails
# mkdir -p /root/plesk-backup-nginx/vhosts
# mkdir -p /root/plesk-backup-apache/webmails
# mkdir -p /root/plesk-backup-apache/vhosts
# mv /etc/nginx/plesk.conf.d/vhosts/* /root/plesk-backup-nginx/vhosts/
# mv /etc/nginx/plesk.conf.d/webmails/* /root/plesk-backup-nginx/webmails
# mv /etc/httpd/conf/plesk.conf.d/vhosts/* /root/plesk-backup-apache/vhosts
# mv /etc/httpd/conf/plesk.conf.d/webmails/* /root/plesk-backup-apache/webmails/
For Debian / Ubuntu:
Code Select
# mkdir -p /root/pleskbackup/
# mv /etc/apache2/plesk.conf.d/vhosts/* /root/pleskbackup
3.Rebuild all web server configuration files from scratch by executing this command:
Code Select
# plesk sbin httpdmng --reconfigure-allIf all of the above solutions do not resolve the error, follow the steps here
1.In Plesk create the domain example.com.
2.Connect to the Plesk server via SSH
3.Rebuild domain's configuration files:
# plesk repair web example.com
4.Remove the domain example.com from Plesk.
Note: In case there are other domains with the same issue, perform the same actions mentioned above.
#7
Web Application / How to Create a Vultr Firewall...
Last post by Suhitha - Sep 30, 2025, 08:28 AMQuestion: How to Create a Vultr Firewall Group
A process that prepares and configures a server or service for use after initial deployment.
Vultr Firewall is a web-based service that filters network traffic to instances in your Vultr account using groups. A Vultr Firewall group consists of multiple IPv4 and IPv6 network rules that enable you to define specific ports and traffic sources to your instances.
Follow this guide to create a new Vultr Firewall group to manage network traffic filtering rules using the Vultr Customer Portal, API, CLI, or Terraform.
Vultr Customer Portal
1.Navigate to Products, expand the Network drop-down and select Firewall from the list of options.
2.Click Add Firewall to set up a new firewall group.
3.Enter your firewall group label in the Description field
4.Click Add Firewall Group to apply the group and manage the network filtering rules.
Vultr API
1.Send a GET request to the List Firewall Groups endpoint and verify all active firewall groups in your Vultr account.
2.Send a POST request to the Create Firewall Group endpoint to create a new Vultr Firewall group.
Visit the List Firewall Groups API page to view additional attributes to apply on the firewall group.
Vultr CLI
1.List all Vultr Firewall groups in your account.
console
$ vultr-cli firewall group list
2.Create a new Vultr Firewall group.
Run vultr-cli firewall group create --help to view additional options to apply on the firewall group.
Terraform
1.Ensure the Vultr Terraform provider is configured in your Terraform project.
2.Create a firewall group (and optionally a rule), then apply.
Apply complete! Resources: 2 added, 0 changed, 0 destroyed.
A process that prepares and configures a server or service for use after initial deployment.
Vultr Firewall is a web-based service that filters network traffic to instances in your Vultr account using groups. A Vultr Firewall group consists of multiple IPv4 and IPv6 network rules that enable you to define specific ports and traffic sources to your instances.
Follow this guide to create a new Vultr Firewall group to manage network traffic filtering rules using the Vultr Customer Portal, API, CLI, or Terraform.
Vultr Customer Portal
1.Navigate to Products, expand the Network drop-down and select Firewall from the list of options.
2.Click Add Firewall to set up a new firewall group.
3.Enter your firewall group label in the Description field
4.Click Add Firewall Group to apply the group and manage the network filtering rules.
Vultr API
1.Send a GET request to the List Firewall Groups endpoint and verify all active firewall groups in your Vultr account.
Code Select
console


$ curl "https://api.vultr.com/v2/firewalls" \
  -X GET \
  -H "Authorization: Bearer ${VULTR_API_KEY}"
2.Send a POST request to the Create Firewall Group endpoint to create a new Vultr Firewall group.
Code Select
console


$ curl "https://api.vultr.com/v2/firewalls" \
  -X POST \
  -H "Authorization: Bearer ${VULTR_API_KEY}"
Visit the List Firewall Groups API page to view additional attributes to apply on the firewall group.
Vultr CLI
1.List all Vultr Firewall groups in your account.
console
$ vultr-cli firewall group list
2.Create a new Vultr Firewall group.
Code Select
console


$ vultr-cli firewall group create --description <label>
Run vultr-cli firewall group create --help to view additional options to apply on the firewall group.
Terraform
1.Ensure the Vultr Terraform provider is configured in your Terraform project.
2.Create a firewall group (and optionally a rule), then apply.
Code Select
terraform


resource "vultr_firewall_group" "web" {
    description = "web-fw"
}

resource "vultr_firewall_rule" "allow_http" {
    firewall_group_id = vultr_firewall_group.web.id
    protocol          = "tcp"
    port              = "80"
    ip_type           = "v4"
    subnet            = "0.0.0.0"
    subnet_size       = 0
    notes             = "Allow HTTP"
}
3.Apply the configuration and observe the following output:Apply complete! Resources: 2 added, 0 changed, 0 destroyed.
#8
Web Application / How to Delete Vultr Firewall G...
Last post by Suhitha - Sep 30, 2025, 08:16 AMQuestion: How to Delete Vultr Firewall Groups and Rules
Permanently removes the selected resource from your Vultr account.
Deleting a firewall group removes all existing rules and detaches all active instances from the group while deleting firewall rules removes traffic filtering on a specific port. Deleted firewall groups or rules cannot be recovered unless recreated using the Vultr Firewall.
Follow this guide to delete Vultr Firewall groups and rules using the Vultr Customer Portal, API, CLI, or Terraform.
Vultr Customer Portal
1.Navigate to Products, expand the Network drop-down and select Firewall from the list of options.
2.Select your target firewall group to manage it.
3.Click Delete Firewall Rule within the action section of your target firewall rule to delete it.
4.Click Delete Group in the top right corner to delete the firewall group and all existing rules.
5.Click Delete Firewall Group in the confirmation prompt to remove the firewall grou and unlink active
instances.
Vultr API
1.Send a GET request to the List Firewall Groups endpoint and note the target firewall group's ID in your output.
3.Send a DELETE request to the Delete Firewall Rule endpoint to delete the firewall rule.
4.Send a DELETE request to the Delete Firewall Group endpoint to delete the firewall group.
Vultr CLI
1.List all firewall groups in your Vultr account and note the target group ID.
2.List all available firewall rules in the firewall group and note the target rule number.
4.Delete the firewall group.
Terraform
1.Open your Terraform configuration where the firewall group and rules are defined.
2.Remove the vultr_firewall_rule blocks you want to delete, or destroy by target; remove the vultr_firewall_group block to delete the group.
3.Apply the configuration and observe the following output:
Apply complete! Resources: 0 added, 0 changed, 1 destroyed.
Permanently removes the selected resource from your Vultr account.
Deleting a firewall group removes all existing rules and detaches all active instances from the group while deleting firewall rules removes traffic filtering on a specific port. Deleted firewall groups or rules cannot be recovered unless recreated using the Vultr Firewall.
Follow this guide to delete Vultr Firewall groups and rules using the Vultr Customer Portal, API, CLI, or Terraform.
Vultr Customer Portal
1.Navigate to Products, expand the Network drop-down and select Firewall from the list of options.
2.Select your target firewall group to manage it.
3.Click Delete Firewall Rule within the action section of your target firewall rule to delete it.
4.Click Delete Group in the top right corner to delete the firewall group and all existing rules.
5.Click Delete Firewall Group in the confirmation prompt to remove the firewall grou and unlink active
instances.
Vultr API
1.Send a GET request to the List Firewall Groups endpoint and note the target firewall group's ID in your output.
Code Select
console


$ curl "https://api.vultr.com/v2/firewalls" \
  -X GET \
  -H "Authorization: Bearer ${VULTR_API_KEY}"
2.Send a GET request to the List Firewall Rules endpoint and note the target firewall rule ID in your output.Code Select
console


$ curl "https://api.vultr.com/v2/firewalls/{firewall-group-id}/rules" \
   -X GET \
  -H "Authorization: Bearer ${VULTR_API_KEY}"
3.Send a DELETE request to the Delete Firewall Rule endpoint to delete the firewall rule.
Code Select
console


$ curl "https://api.vultr.com/v2/firewalls/{firewall-group-id}/rules/{firewall-rule-id}" \
  -X DELETE \
  -H "Authorization: Bearer ${VULTR_API_KEY}"
4.Send a DELETE request to the Delete Firewall Group endpoint to delete the firewall group.
Code Select
console


$ curl "https://api.vultr.com/v2/firewalls/{firewall-group-id}" \
   -X DELETE \
   -H "Authorization: Bearer ${VULTR_API_KEY}"
Vultr CLI
1.List all firewall groups in your Vultr account and note the target group ID.
Code Select
console


$ vultr-cli firewall group list
2.List all available firewall rules in the firewall group and note the target rule number.
Code Select
console


$ vultr-cli firewall rule list <firewall-group-id>
3.Delete the firewall rule.Code Select
console


$ vultr-cli firewall rule delete <firewall-group-id> <firewall-rule-number>
4.Delete the firewall group.
Code Select
console


$ vultr-cli firewall group delete <firewall-group-id>
Terraform
1.Open your Terraform configuration where the firewall group and rules are defined.
2.Remove the vultr_firewall_rule blocks you want to delete, or destroy by target; remove the vultr_firewall_group block to delete the group.
Code Select
terraform


resource "vultr_firewall_group" "web" {
    description = "web-fw"
}

resource "vultr_firewall_rule" "allow_http" {
    firewall_group_id = vultr_firewall_group.web.id
    protocol          = "tcp"
    port              = "80"
    ip_type           = "v4"
    subnet            = "0.0.0.0"
    subnet_size       = 0
    notes             = "Allow HTTP"
}

# To delete a specific rule, remove its block or run:
# terraform destroy -target vultr_firewall_rule.allow_http

# To delete the group (and its rules), remove the group block or run:
# terraform destroy -target vultr_firewall_group.web
3.Apply the configuration and observe the following output:
Apply complete! Resources: 0 added, 0 changed, 1 destroyed.
#9
Web Application / How to Create Vultr Firewall R...
Last post by Suhitha - Sep 30, 2025, 08:04 AMQuestion: How to Create Vultr Firewall Rules
Define network security policies that control inbound and outbound traffic to your Vultr resources.
Vultr Firewall rules enable traffic filtering using port numbers and source IP addresses for incoming network requests. A Vultr Firewall group contains multiple rules that define specific the flow of network traffic to attached instances.
Follow this guide to create Vultr Firewall rules using the Vultr Customer Portal, API, CLI, or Terraform.
Vultr Customer Portal
1.Navigate to Products, expand the Network drop-down and select Firewall from the list of options.
2.Select your target firewall group to manage it.
3.Click your target network type on the left navigation menu to modify the incoming traffic rules.
4.Click the Protocol drop-down to select a common network application profile or choose Custom from the list and enter your target network port in the Port (or range) field.
5.Click the Source drop-down, select your traffic source and enter the target source IP address.
6.Click Add note and enter a descriptive label to identify the new firewall rule.
7.Click Add Firewall Rule within the Action section to apply the new rule to your firewall group.
Vultr API
1.Send a GET request to the List Firewall Groups endpoint and note the target firewall group ID in your output.
2.Send a GET request to the List Firewall Rules endpoint to view all active rules in the firewall group.
3.Send a POST request to the Create Firewall Rules endpoint to create a new rule in the firewall group.
Vultr CLI
1.List all firewall groups in your Vultr account and note the target firewall group ID.
2.List all rules in the firewall group.
3.Create a new firewall rule.
Run vultr-cli firewall rule create --help to view additional options to apply on the firewall rule.
Terraform
1.List all firewall groups in your Vultr account and note the target firewall group ID.
2.List all rules in the firewall group.
3.Create a new firewall rule.
Run vultr-cli firewall rule create --help to view additional options to apply on the firewall rule.
Define network security policies that control inbound and outbound traffic to your Vultr resources.
Vultr Firewall rules enable traffic filtering using port numbers and source IP addresses for incoming network requests. A Vultr Firewall group contains multiple rules that define specific the flow of network traffic to attached instances.
Follow this guide to create Vultr Firewall rules using the Vultr Customer Portal, API, CLI, or Terraform.
Vultr Customer Portal
1.Navigate to Products, expand the Network drop-down and select Firewall from the list of options.
2.Select your target firewall group to manage it.
3.Click your target network type on the left navigation menu to modify the incoming traffic rules.
4.Click the Protocol drop-down to select a common network application profile or choose Custom from the list and enter your target network port in the Port (or range) field.
5.Click the Source drop-down, select your traffic source and enter the target source IP address.
6.Click Add note and enter a descriptive label to identify the new firewall rule.
7.Click Add Firewall Rule within the Action section to apply the new rule to your firewall group.
Vultr API
1.Send a GET request to the List Firewall Groups endpoint and note the target firewall group ID in your output.
Code Select
console


$ curl "https://api.vultr.com/v2/firewalls" \
  -X GET \
  -H "Authorization: Bearer ${VULTR_API_KEY}"
2.Send a GET request to the List Firewall Rules endpoint to view all active rules in the firewall group.
Code Select
console


$ curl "https://api.vultr.com/v2/firewalls/{firewall-group-id}/rules" \
   -X GET \
   -H "Authorization: Bearer ${VULTR_API_KEY}"
3.Send a POST request to the Create Firewall Rules endpoint to create a new rule in the firewall group.
Code Select
console


$ curl "https://api.vultr.com/v2/firewalls/{firewall-group-id}/rules" \
   -X POST \
   -H "Authorization: Bearer ${VULTR_API_KEY}" \
   -H "Content-Type: application/json" \
   --data '{
     "ip_type" : "<network-type>",
     "protocol" : "<protocol>",
     "port" : "<target-instance-port>",
     "source" : "<source-address>",
     "notes" : "<label>"
   }'
Visit the List Firewall Rules API page to view additional attributes to apply on the firewall rule.Vultr CLI
1.List all firewall groups in your Vultr account and note the target firewall group ID.
Code Select
console


$ vultr-cli firewall group list
2.List all rules in the firewall group.
Code Select
console


$ vultr-cli firewall rule list <firewall-group-id>
3.Create a new firewall rule.
Code Select
console


$ vultr-cli firewall rule create --id=<firewall-group-id> --ip-type=<network-type> --protocol=<protocol> --source=<source-address> --port=<target-instance-port>
Run vultr-cli firewall rule create --help to view additional options to apply on the firewall rule.
Terraform
1.List all firewall groups in your Vultr account and note the target firewall group ID.
Code Select
console


$ vultr-cli firewall group list
2.List all rules in the firewall group.
Code Select
console


$ vultr-cli firewall rule list <firewall-group-id>
3.Create a new firewall rule.
Code Select
console


$ vultr-cli firewall rule create --id=<firewall-group-id> --ip-type=<network-type> --protocol=<protocol> --source=<source-address> --port=<target-instance-port>
Run vultr-cli firewall rule create --help to view additional options to apply on the firewall rule.
#10
Others / Security Alert: CVE-2024-4577 ...
Last post by senthil - Sep 30, 2025, 08:03 AMSituation
Impact
Potentially allow unauthenticated attackers to bypass previous protections and execute arbitrary code on remote
PHP servers through an argument injection attack.
Status
The issue was investigated by our Security Team concluding that Plesk is not affected because:
Therefore Plesk users are not susceptible to this PHP for Windows vulnerability. Nonetheless Plesk PHP versions
will be updated to the corrected ones as usual on its upcoming releases.
- Critical vulnerability CVE-2024-4577 has been identified in PHP, affecting all versions of PHP installed on the
Windows operating systems below the next: - PHP 8.3: < 8.3.8
- PHP 8.2: < 8.2.20
- PHP 8.1 < 8.1.29
Impact
Potentially allow unauthenticated attackers to bypass previous protections and execute arbitrary code on remote
PHP servers through an argument injection attack.
Status
The issue was investigated by our Security Team concluding that Plesk is not affected because:
- For Windows it runs PHP in FastCGI mode and does not support the CGI mode.
- Plesk supports CGI, but it does not put the php.exe or php-cgi.exe binaries into the /cgi-bin/ directories and
does not expose PHP binaries to CGI in other ways (e.g. via web server configuration).
Therefore Plesk users are not susceptible to this PHP for Windows vulnerability. Nonetheless Plesk PHP versions
will be updated to the corrected ones as usual on its upcoming releases.